
Written and fact checked by

Last reviewed September 21, 2026
Front lever at a glance
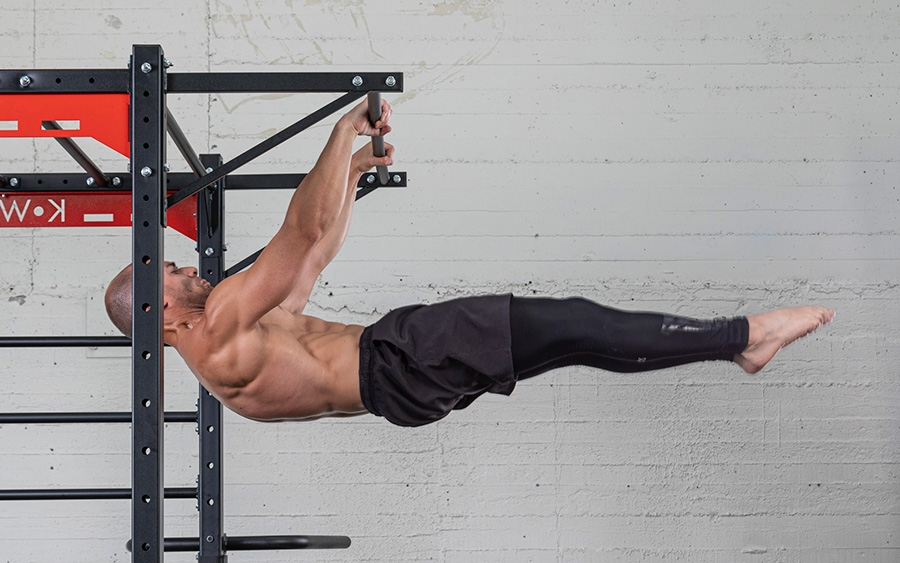
A front lever is a straight-arm horizontal hold beneath a bar or rings. You earn it by learning to depress the shoulders, keep the pelvis tucked, and lengthen the lever only when you can hold the current shape without sagging.
- Train it first: practice while your shoulders and nervous system are fresh.
- Quality beats duration: five clean seconds teach more than 15 seconds with bent arms and dropped hips.
- Use two movement types: holds teach position; pulls and negatives build strength through range.
- Progress by shape: tuck, advanced tuck, one leg, straddle, then full lever.
A front lever is an isometric hold, but it requires continuous effort. Your hands pull against the bar, your lats pull your arms toward your hips, and your trunk keeps the lower body from folding toward the floor.
Most people stall because they extend their legs before they can control the easier progressions. Their hips drop and the lower back arches. Return to a shorter lever, improve the position, and extend the legs gradually.
What Makes a Front Lever Work?
Your shoulders are the pivot. The farther your body mass extends from that pivot, the more torque your back and shoulders must resist. Tucking both knees brings your mass closer and makes the hold manageable. Opening the hips, extending one leg, or spreading into a straddle increases the demand.
The lats provide much of the shoulder-extension force. The long head of the triceps also helps hold the arm position. The abs, obliques, glutes, and spinal stabilizers keep the body from folding. Grip strength matters too, although it is rarely the first limiting factor on a bar.
Front Lever Readiness Benchmarks
You do not need a magic number of pull-ups before starting. You do need pain-free straight-arm hanging, basic scapular control, and enough trunk tension to keep your ribs from flaring.
| Checkpoint | Useful starting target | What it tells you |
|---|---|---|
| Active hang | 20–30 seconds | You can keep the shoulders engaged while hanging |
| Scapular pull-ups | 8 controlled reps | You can move the shoulder blades without bending the elbows |
| Hollow-body hold | 20–30 seconds | You can connect ribs and pelvis under tension |
| Inverted hang | 10–15 seconds | You are comfortable controlling your body beneath the bar or rings |
Treat these targets as general guidelines. If a movement causes sharp pain in the shoulder, elbow, or biceps, stop training the lever and address the pain before increasing the difficulty.

The Five Front Lever Progressions That Matter
Move to the next progression after you can repeat clean holds across several sessions. One longer attempt with poor form is not enough.
1. Tuck
Knees close to the chest. Flatten the back and keep the hips level with the shoulders.
2. Advanced tuck
Open the hips until the thighs point downward while the knees remain bent.
3. One leg
Extend one leg while the other stays tucked. Alternate sides to avoid hiding an imbalance.
4. Straddle
Straighten both legs and spread them. A wider straddle shortens the effective lever.
5. Full lever
Bring the legs together without losing the shoulder position or letting the hips fall.
When to Move to the Next Progression
A practical target is three sets of 8–12 clean seconds with roughly two minutes of rest. Then test the next shape for short, controlled attempts. If your elbows bend, shoulders shrug, or hips fall, return to the previous progression and build more time there.
Resistance bands can bridge a large jump, especially between advanced tuck and straddle. Attach a resistance band above you and support the hips or feet. Use only enough help to preserve the line; a band that launches you upward teaches a different skill.
Exercises That Carry Over to the Front Lever
Front Lever Raises and Negatives
Start from an inverted hang and lower into your strongest lever shape for three to five seconds. Stop when you can no longer control the descent. Negatives show where your body position begins to fail. Raises build strength through the same range in the opposite direction.

Ice Cream Makers
Hold the top of a pull-up, extend toward a lever, then return your chest to the bar. Keep the hips high and choose a tuck or one-leg shape you can control. The exercise connects bent-arm pulling strength with the straight-arm position.
Weighted Pull-Ups
Weighted pull-ups build the high-force pulling base that supports harder lever work. They are useful, but not specific enough to replace straight-arm training. Pair them with holds or negatives instead of treating them as the entire program.
Hollow-Body Holds
Press the lower back into the floor, lift the shoulders, and extend only as far as you can without the back arching. The floor gives instant feedback that a hanging lever does not. If you cannot keep contact, shorten the shape by bending the knees.
A Front Lever Workout You Can Actually Recover From
| Exercise | Sets × reps or time | Rest |
|---|---|---|
| Best clean lever hold | 4 × 6–10 sec | 2–3 min |
| Lever negative or raise | 3 × 3–5 reps | 2–3 min |
| Weighted pull-up or row | 3 × 4–8 reps | 2–3 min |
| Hollow-body hold | 3 × 20–30 sec | 60–90 sec |
Train this twice per week with at least 48 hours between sessions. If the front lever is your main goal, practice it after warming up and before hard bouldering. Otherwise, place it after climbing or on a separate strength day so tired lats do not reduce your climbing performance.
Why Your Front Lever Keeps Dropping
| What you see | Likely cause | What to change |
|---|---|---|
| Hips below shoulders | The progression is too long | Tuck farther or add band assistance |
| Bent elbows | Using pull-up strength to escape weak straight-arm force | Reduce difficulty and lock the elbows before lifting |
| Arched lower back | Lost rib-to-pelvis tension | Use hollow holds and squeeze glutes before each attempt |
| Shrugged shoulders | Poor scapular depression or fatigue | Practice active hangs and end the set earlier |
| No progress for weeks | Testing too often, training too little | Accumulate clean submaximal sets and retest monthly |
When to Attempt a Harder Progression
Use a progression you can repeat with straight elbows, engaged shoulders, level hips, and minimal swinging. Build enough strength to hold that position consistently before moving to the next variation.
Frequently Asked Questions
How long does it take to learn a front lever?
There is no reliable universal timeline. Training history, body proportions, body mass, straight-arm strength, and consistency all matter. Someone with a strong pulling base may progress in months; a newer athlete may need much longer.
Are front levers useful for climbing?
They build body tension and shoulder-extension strength that can help on steep terrain. They are still a supplemental exercise. Finger strength, footwork, movement skill, and climbing-specific practice have more direct transfer.
Should I train front lever on a bar or rings?
A fixed bar is easier to standardize. Rings allow the hands and shoulders to rotate more naturally but demand more control. Use the option that feels stable and pain-free.
Can I train front lever every day?
Daily maximal attempts are usually unnecessary and can irritate the elbows or shoulders. Two or three focused sessions per week give most people enough practice while preserving recovery.
Do I need a strong core or strong lats?
Both. The lats and shoulder extensors create the force around the shoulder joint; the trunk and glutes keep that force connected to the legs. A weak link anywhere bends the line.