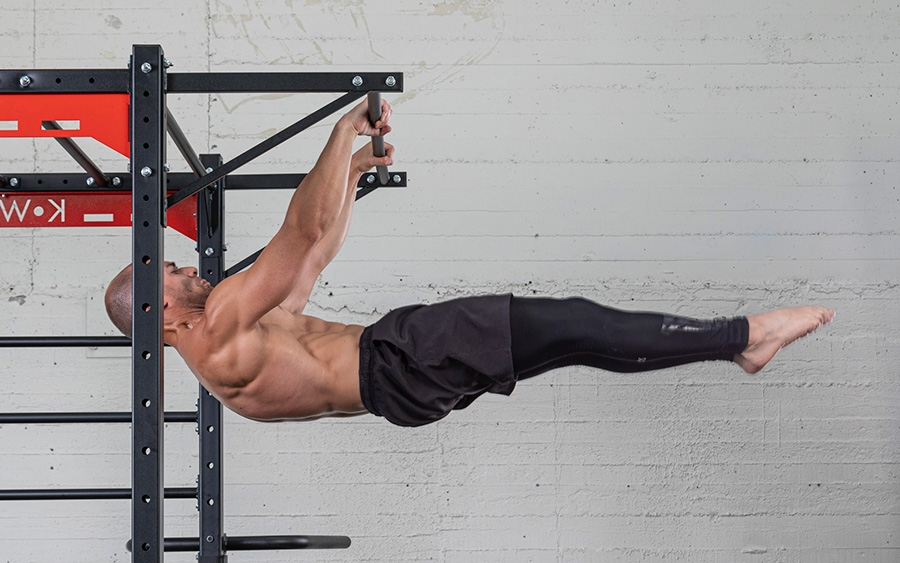
The front lever is an impressive display of strength and a top-tier bodyweight exercise. It builds serious back and core power, requiring you to hold your body completely horizontal, facing upwards, with straight arms. It’s a cool skill that many aspire to achieve in their calisthenics journey.
While mastering the front lever is a challenge, and individual factors like body type do play a significant role (for instance, being heavier or having a lower center of gravity can make it harder), it’s a goal that can be reached with dedicated training and the right methods.
The journey to a full front lever involves breaking the skill down into smaller, manageable steps, known as lever progressions. These steps, like the tuck front lever and straddle front lever, help you build strength methodically and avoid hitting frustrating plateaus.
What is a Front Lever?
A front lever is an advanced bodyweight exercise where you hold your body perfectly straight and horizontal, parallel to the ground, while hanging from a bar or rings with straight arms. It’s a static hold that demands incredible strength.
- Latissimus Dorsi (Lats)
- Core Muscles (Abs, Obliques, Lower Back)
- Posterior Deltoids (Shoulders)
- Triceps (Arms)
To perform a front lever, you’ll mainly engage your latissimus dorsi (lats), which are large back muscles. Your core muscles (abs, obliques, lower back) are also crucial for keeping your body stiff and straight. Additionally, muscles in your shoulders (posterior deltoids) and arms (triceps) work to stabilize the position.
💡The front lever is a pulling exercise that mainly uses muscles in your back and chest to pull your body towards your hands.
Core Strength & How to Build It
A rock-solid core is non-negotiable for front lever training. Strong core muscles make the entire process easier because they allow you to better activate your back muscles and maintain control in the challenging lever position.
Think of your core as the bridge that connects your upper and lower body; if it’s weak, the bridge will sag.
Excess core strength actually makes it easier to focus on using your back muscles correctly during the front lever. This control is vital for holding good form, especially as you move to more advanced progressions like the single leg front lever.
💡Consistent practice of specific exercises, including foundational movements like pull-ups and weighted pull-ups, help a lot in building towards a front lever.
Exercises for Building Front Lever Core Strength
To build the core strength needed for the front lever, certain exercises are particularly effective. Incorporate these into your routine:
1. L-sit

This exercise is fantastic for strengthening the lower core and hip flexors. It involves holding your body up with straight arms (on the floor, parallettes, or rings) with your legs extended straight out in front of you, forming an “L” shape.
2. Weighted Pull-Ups

As mentioned, weighted pull-ups are a fantastic supplementary exercise. They directly strengthen your lats, shoulders, and arms—the primary movers in the front lever. Stronger pull-ups translate to a stronger foundation for your lever training.
3. Inverted Hangs

The inverted hang is a fundamental starting position for many front lever training methods. You perform a front lever by lowering from an inverted hang.
To get into an inverted hang, hang from a pull-up bar with straight arms, then lift your legs up and over until you are hanging upside down, body straight. Holding this position builds isometric strength in the upper body and core, as well as crucial grip strength.
Regular practice of inverted hangs, and learning to control the descent from them can get you much closer to your first front lever.
4. Front Lever Negatives and Lever Pulls

These are dynamic exercises vital for building strength.
- Front Lever Negatives: Start in an inverted hang or the highest front lever progression you can manage. Slowly lower your body towards the full front lever position, trying to maintain a horizontal line for as long as possible with perfect form. This eccentric contraction is powerful for strength building.
- Lever Pulls (or Front Lever Raises): Starting from a dead hang or a slight arch, pull your body up towards your chosen front lever progression (e.g., tuck front lever pull). This focuses on the concentric part of the movement.
5. Ice Cream Makers

This dynamic movement involves pulling up towards a front lever position from a dead hang and then lowering yourself as slowly as possible. It’s excellent for building both pulling strength and core stability.
Step-by-Step Front Lever Progression Guide
The path to the full front lever is paved with consistent practice of specific progressions. Each step builds upon the last, requiring more strength, control, and dedication. The goal is to hold each progression with good form for a set amount of time (e.g., 15-30 seconds or longer for foundational holds like the tuck) before moving to the next.
Here’s a typical front lever progression path:
1. Tuck Front Lever

The tuck front lever is your starting point.
To perform it, hang from a bar or rings with straight arms. Pull your knees as close to your chest as possible. Actively retract your scapula (pull your shoulder blades back and down) and lift your hips until your torso is parallel to the ground. Your arms should remain straight throughout the movement.
This progression primarily focuses on building initial strength, establishing proper body positioning, and mastering scapular retraction.
“Pull your shoulder blades down and together while you apply downward pressure on the rings or bar. This creates a good ‘packed shoulder’ position and activates all of your musculature through your torso, giving you a leverage advantage.”
—Steven Low, Author of “Overcoming Gravity”

2. Advanced Tuck Lever

Once you’re comfortable with the tuck front lever, progress to the advanced tuck lever.
From the tuck position, slightly extend your hips so your back flattens out, and your knees are stacked directly over your hips. Your thighs should be roughly perpendicular to your torso. The key here is to maintain a horizontal alignment of your shoulders and hips.
This variation demands increased core and back engagement and helps you develop a flatter body line.
“The pull is similar to the feeling of trying to force the bar to your hips or knees with your hands. Remember to squeeze your scapulas together while performing this movement.”
—Steven Low, Author of “Overcoming Gravity”
3. Single Leg Front Lever

The single leg front lever introduces a longer lever, making the exercise more challenging.
From the advanced tuck position, extend one leg straight out in line with your body while keeping the other leg tucked. Remember to alternate legs between sets to ensure balanced development.
This progression helps you build unilateral control and adapt to the increased leverage.
⚠️ Common mistakes include:
- sagging hips
- a rounded chest
- weak back muscles near the shoulder blades
Work on these weaknesses to improve.
4. Straddle Front Lever

The straddle front lever further increases the lever length and requires more strength and flexibility.
From the advanced tuck or single leg position, extend both legs outwards into a V-shape (straddle). The wider your straddle, the easier the exercise will be; as you get stronger, aim to narrow your straddle. Keep your legs straight and your entire body horizontal.
This step focuses on increasing lever length and improving hip flexibility.
5. Full Front Lever

The full front lever is the ultimate goal of this progression.
To achieve it, extend both legs fully straight and together, keeping your entire body perfectly horizontal from your shoulders to your feet. Your arms should remain straight, and your core and back muscles should be fully engaged to maintain a rigid, flat body line.
Achieving the full front lever demonstrates maximum strength, perfect form, and complete full body tension.
⚠️ Do not round your back and shoulders.
This makes the exercise easier but uses incorrect form.
How to Progress Gradually

Lever progression is all about gradually increasing the difficulty of the exercise by changing your body’s position. This systematic approach allows you to build strength, control, and endurance over time. You’ll typically move from positions where your body is more tucked and the lever is shorter, to positions where your body is more extended and the lever is longer, making it harder to hold.
These progressions can, and should, be tailored to your individual strength levels and goals. Stagnation in front lever progress often occurs if your training methods don’t match your current strength or body dimensions, so listening to your body and adjusting is key.
When working on your lever progression, tools like resistance bands and weights can help a lot.
- Resistance Bands: These are excellent for assisting with front lever progressions. You can loop a resistance band around the pull-up bar and place it under your hips or back for support. This reduces the amount of weight you have to hold, allowing you to practice the correct form and build strength gradually. Resistance bands can be used for any front lever progression.
- Weights: While you wouldn’t typically add weights directly to the front lever hold itself (as it’s already a bodyweight challenge), incorporating weighted exercises like weighted pull-ups into your training program will build the foundational strength in your lats and shoulders, which are very important for performing a front lever.
💡As you get stronger, you can use resistance bands with less tension to gradually decrease the amount of assistance you receive. This allows for measurable progression as you build strength.
How to Stay Focused & Motivated
Getting your first front lever isn’t just a physical challenge; it’s a mental one too. Building confidence, focus, and mental toughness is critical.
Here are a few tips to stay consistent:
- Visualization: Mentally rehearsing the movement, imagining yourself successfully performing the front lever, can build confidence and improve your mind-muscle connection.
- Goal Setting: Set realistic, achievable goals along your lever progression. Tracking your progress—noting how long you can hold a progression or how many reps you can do—helps build motivation and mental toughness.
- Consistency: Regular practice and consistent training are key. Each session, no matter how small, contributes to your progress and builds both physical strength and mental preparation.
Ready to Take on the Challenge?
Achieving your first front lever is a significant milestone in any fitness journey. It requires dedication, smart training through methodical lever progression, and a commitment to building foundational core strength. Remember that body type can influence the difficulty, but with the right approach and consistent effort, holding that impressive horizontal position is within reach.
Once you master the full front lever, there are even more advanced skills to explore, like the muscle-up.
Frequently Asked Questions
What exactly is a front lever?
The front lever is an advanced bodyweight exercise where you hold your body completely horizontal to the ground, facing upwards, with your arms straight. It is a challenging skill that builds significant back and core strength and is a popular goal in calisthenics.
Why is a strong core essential for the front lever?
A strong core is crucial because it acts as the bridge connecting your upper and lower body, enabling you to maintain control and proper form. It also helps you activate your back muscles more effectively, which makes holding the demanding lever position easier.
What are the best core exercises for front lever training?
Effective core exercises for the front lever include the L-sit for lower core and hip flexors, the dragon flag for intense overall core strength, and ice cream makers. Additionally, lever pulls and front lever negatives directly target the specific core and back muscles used in the front lever.
How does the lever progression system work for the front lever?
Lever progression involves systematically increasing the difficulty of the exercise by changing your body’s position, typically moving from tucked positions to more extended ones. This methodical approach allows you to gradually build the necessary strength, control, and endurance required for the full front lever.
What are the key steps to achieve a full front lever?
The typical progression to a full front lever starts with mastering the tuck front lever, then advancing to the advanced tuck lever, the single leg front lever, and finally the straddle front lever. Each stage builds upon the previous one, preparing your body for the strength and control needed for the full, straight-body hold.
How can resistance bands assist with front lever training?
Resistance bands can help by providing upward support during front lever progressions, which reduces the amount of bodyweight you need to hold. You can loop a band around the pull-up bar and place it under your hips or back, allowing you to practice the movement with correct form and build strength more gradually.
Do things like body type make the front lever harder to learn?
Yes, individual factors such as body type can influence how difficult it is to learn the front lever. For instance, being heavier or having a lower center of gravity can make the skill more challenging, but it is still an achievable goal with dedicated and appropriate training.
What are front lever negatives and lever pulls?
Front lever negatives involve starting from an inverted hang or your highest achievable lever progression and then slowly lowering your body towards the full front lever position, focusing on maintaining control and form. Lever pulls, or front lever raises, are the opposite: you pull your body upwards from a dead hang towards a chosen front lever progression, emphasizing the concentric part of the movement.